

This site contains affiliate links. As an Amazon Associate, We earn a commission from qualifying purchases at no extra cost to you.
Your MacBook Pro’s disk space is crucial for smooth operation. We hesitate to delete important files like photos and documents when it’s low. Luckily, there’s System Data, which is often unused and takes up space.
Want to learn more about it and how to free up space? Keep reading for insights and tips.
Key Takeaways:
- System Data: Includes unnecessary files like backups and caches, taking up space on your MacBook Pro.
- Locations: Found in Downloads, Library, and Documents/Logs folders, often categorized as “Other” in storage settings.
- Management: Delete unused installation files from Downloads and clear out old files from Library and Logs folders.
- Using Tools: Consider using apps like CleanMyMac X to identify and remove System Data files safely.
- Caution and Backup: Research files before deleting and back up important data before cleanup. Empty trash only after ensuring the system runs smoothly.
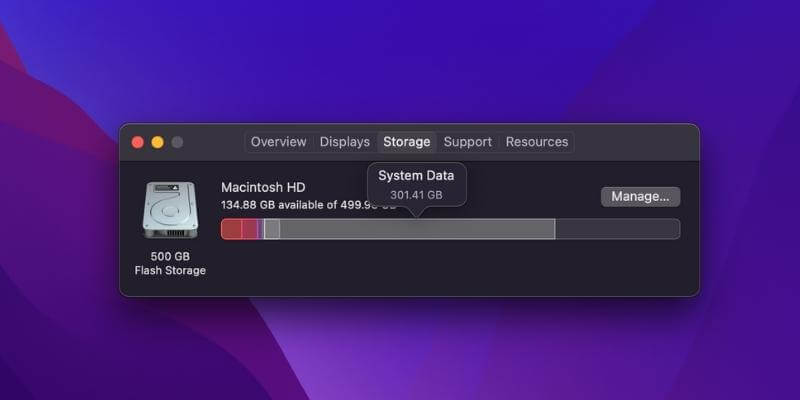
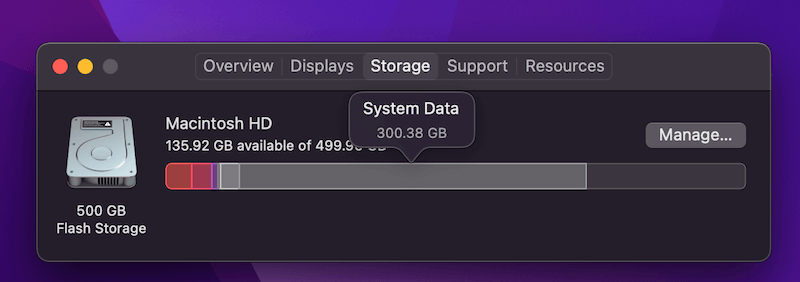
What is “System Data” under Storage?
If you are reading this article, you may have been investigating what is taking up all the space on your MacBook’s hard drive and have seen the System Data category when looking at the Storage tab in the About This Mac utility.
If you haven’t seen this, you may be wondering what this is and looking for a way to clear space from your hard drive.
System Data is a category of space that was previously used on older macOS versions, and it was kind of a bucket of file types that did not fit into any of the other categories such as documents, media, etc. Therefore this category contained all types of miscellaneous files.
It included files such as backup files created by applications, cache files, temporary files, log files, and more. Basically, any file that could not be designated as one of the main categories.
While this category may not show under older macOS versions, the files still do, and these are what we will be discussing and figuring out how to delete so that we can create more space on our drive.
Where Are “System Data” Files Located?
Now that you know what files are included in this category, you may be wondering where they are located and how to identify them. Unfortunately, these files can exist almost anywhere on your system, but there are some common places we can look for them.
Since there are several different types of these files, and they can exist in so many places, it is hard to tell where they may be on your machine. Here, we will take a look at some of the places that you might find them and some examples of ones that you may see on your system.
~/Downloads
One of the best places to start is your downloads directory. This will often have installation files and other files you have downloaded from the internet, such as .zip, .dmg, and many others. These are usually files that can be removed once they have been used.
They are used to install the application, and once the installation is complete, there is really no use for them. You might think about saving them in case something goes wrong with your app, and you need to reinstall it, but you can always download it again from wherever you got it.
These files can eat up a large amount of space, and if you know you have already installed the application from the .dmg or extracted the information from the .zip, .tar, or other files, there is probably no reason to save it, but as with any of these, use your own judgment.
You can get to the Downloads folder using the following steps.
- Open Finder.
- On the menu, select Go and then click on Go To Folder.
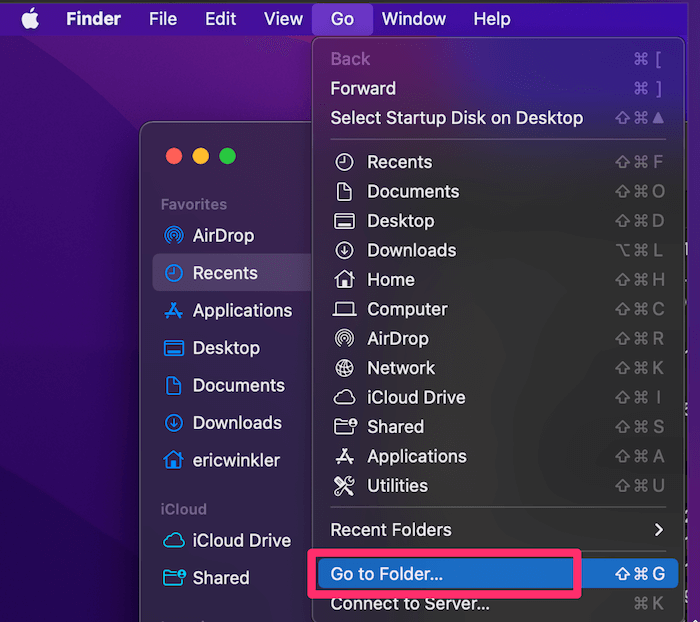
- In the popup window, type ~/Downloads.
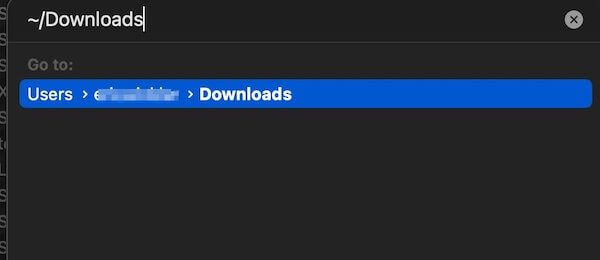
- Click on the Go button or double-click on the location shown to go there.
Once you are there and find files or folders you wish to delete, simply right-click on them, then select Move to Trash.
~/Library
The Library folder is another good place to find files that are often categorized as Other. You can use the same steps you used above to get to the Downloads directory and then to the Library directory. Just type in ~/Library in the Go To Folder popup.
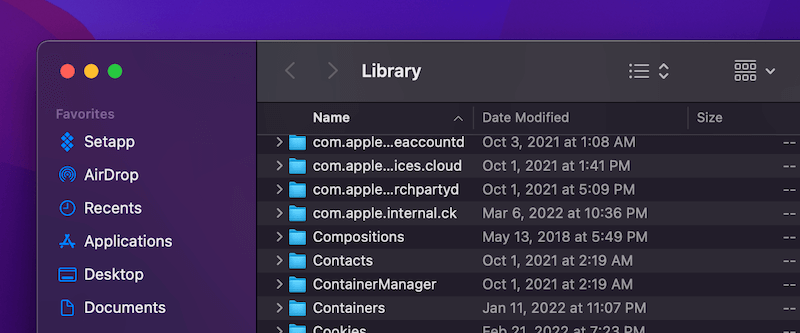
Once you get to the Library folder, many different sub-folders can have System Data files that you may delete.
Look at folders such as Cache, Cookies, Logs, and others. If you see folders with application names that you don’t use or have removed, you can delete those. You can also delete other files on mac to free up storage.
Explore the subfolders and look for files that you might be able to get rid of. Use caution as you would when deleting any other files.
~/Documents/Logs
This is another common area where you can find lots of files that may be categorized as Other. Log files often collect information about how an application or operating system tasks are functioning. After long periods, these files can grow to be quite large.
Deleting these files will not usually cause a problem. If they are needed, the application or system process will regenerate a new one. Log files are often used to debug or figure out why something is malfunctioning.
The only drawback to removing them is that the information may be lost and would not be able to be used. Generally, if the file is logging a recurring problem, the error or log message will be regenerated anyway, so in most cases, there is no need to worry when removing these.
You can use the same methods as above to find this log directory, and there are probably other log directories elsewhere on your drive, such as the one in the Library. Log files are some of the safest files to remove, so these are some good ones to look out for.
A Quick Way to Delete “System Data” Files
If you are still feeling unsure about removing files from your system to gain space, that is perfectly understandable. It can often be worrisome and may cause some anxiety over whether or not you might remove a critical file and cause your system to crash.
If this is the case for you, there are Mac cleaner apps and tools out there that can help you clean space from your Mac’s hard drive. Most of these tools work very well, and are aware of critical files that need to be preserved on your machine.
We recommend CleanMyMac X because it has a “Space Lens” feature that’s perfect for locating different types of System Data files, showing you how much space they are taking, and with a few clicks, you can clean them in just a few seconds.
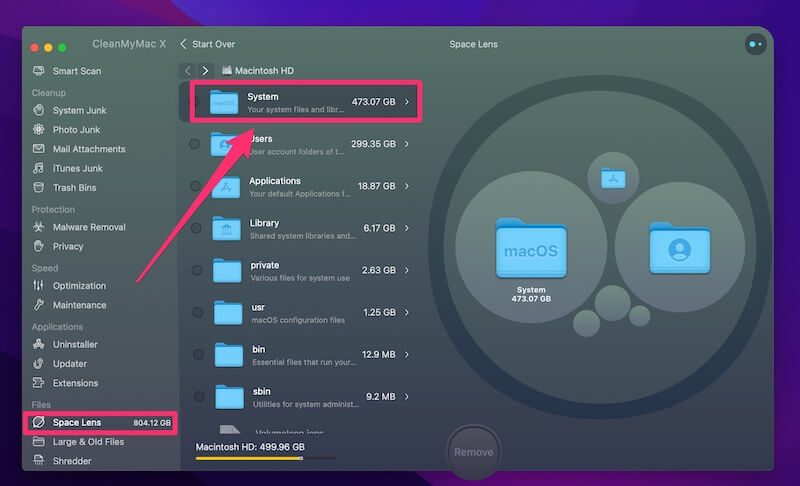
Clicking on System allows me to see more about what’s included in this category.
As you review these files, click to select those you feel comfortable deleting, and then you can hit the “Remove” button to clean them all at once.
Note: CleanMyMac X is not freeware, but it has a trial version that you can try out for free. Learn more about this app or get it here.
Additional Tips
Before you delete any files from your MacBook Pro, it is important to remember that you should make sure that you know what the files you are deleting are and that they are not ones your system needs. Deleting the wrong files can lead to issues with your computer.
When in doubt, do some research to find out what the files are and if your system needs them. If you are still unsure and must delete them, move them to a backup location first and keep them there until you know your system is still performing ok.
When deleting the files, they will remain in the trash until you empty them, so you can also recover them from there if needed. You might even do a backup before removing files just to make sure you can restore everything if there is a problem.
With many files and file types, you can usually do a Google search and find out what they are. If they are not operating system files or application files, then you may be okay with removing them.
Files such as cache files, temporary files, installation files, and log files are usually ok to get rid of, especially if they are old. Take a look at the date and determine how old they are. When you find these types of files, which are more than a year old, it should be safe to remove them.
In the end, you will have to do some research, use some caution, and use your own judgment when determining what you can get rid of. If you are in doubt, just ensure you don’t empty your trash for a while. At least not until you know your system is still running okay.
And if all of your data is important and you don’t want to delete anything, then you should add extra storage, this will help you to keep your data as well as extra storage for further work.
Final Words
There are many files on your Mac that can be categorized as System Data. Even though this category is no longer used on older macOS, they are still a type of file that can eat up large amounts of space and files that you want to look for when trying to clear space on your system.
I hope the information provided above can help to get you started with your system data clean-up. As usual, feel free to let me know if you have any questions. We would love to hear from you!
About Eric