


This site contains affiliate links. As an Amazon Associate, We earn a commission from qualifying purchases at no extra cost to you.
Arranging the windows on your MacBook Pro into a split-screen view is easy. But did you know you don’t have to resize each window by clicking and dragging?
Apple has a shortcut feature to automatically resize each window to fit your screen’s left or right side perfectly. All you have to do is hover over the green button on the top left of your window and select where you want to move it.
I’m Jon, an Apple enthusiast, and owner of a 2019 Macbook Pro and several other Apple devices. I use my MacBook every day, and I’m always learning new features and shortcuts.
I recently learned how to use the split-screen shortcuts and my MacBook Pro, and I put together this guide to show you how. So, continue reading!
How to Split The Screen on Your MacBook Pro
A split view is an excellent way for multitaskers to get more done. Constantly switching back and forth between multiple apps and windows can be a nuisance, especially when you need information from both windows at once. Viewing the two windows side by side makes things a lot easier.
Luckily, Apple offers a split-screen view function that allows you to place two apps or windows side by side on the display. Using this function, you can avoid going back and forth between screens, as you have everything you need right in front of you.
Locate The Full-Screen Button
If you’re using a macOS Catalina or later, you can easily switch to split view with a few simple clicks. Locate the full-screen button, which is a small green circle with two arrows in the upper left corner of the window.
Once you find the button, hover your pointer over the button. Alternatively, click and hold the button.
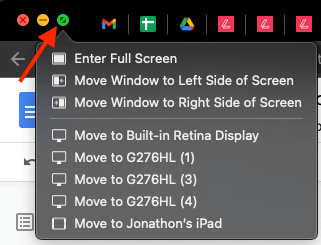
Choose The Correct Setting
A short menu should appear when you hover the pointer over the full-screen button (or if you click and hold). Choose “Move Window to Left Side of Screen” or “Move Window to Right Side of Screen.” The window you’re in will fill the left or right side of the screen, depending on your selection.

To fill the other side of the screen, click a window on the other side. Once the screens are side by side, you can begin using both side by side.
Create Your Own Keyboard Shortcut
You can create your own shortcut and forego these steps altogether if you’d like. Go to System Preferences (System Settings on macOS Ventura and above) > Keyboard > Shortcuts > App Shortcuts to make your own shortcut.


Click the + button to add a command named “Move Window to Left Side of Screen” using a particular shortcut.

I made the shortcut “Control + Command + ←” in my example. So, now I just have to press these keys to snap my current window to the left side of my monitor. (For the right side, I made the short “Control + Command + →.” Intuitive, right?
If Split View Doesn’t Work
If the split-view function doesn’t work on your MacBook Pro, click on the Apple logo to bring up the Apple menu. Once the menu opens, select System Preferences.

Click Mission Control.

Once the window opens, double-check that “Displays have separate Spaces” is selected.

Note: This change may require you to log out and back in for the change to take effect.
Instead of split screen, you can connect two monitors to your MacBook pro with thunderbolts.
How to Use Split-Screen Mode with Other Versions of macOS
The switch to split-screen mode looks slightly different if you’re using macOS Mojave, High Sierra, Sierra, or El Capitan on your MacBook Pro.
Click The Full-Screen Button
Locate the full-screen button, which is a small green circle, in the upper-left corner of the window you’re in. click and hold the button.
Drag The Window
While holding down the button, the window will shrink. Once it shrinks, you can drag it to either side of the screen. Release the button to drop the window on the left or right side of the screen.
Use the same process to move a window to the opposite side of the screen. Once you maneuver the second window into place, you can begin using both windows side by side.
How to Exit Split Screen on MacBook Pro
After using the split-screen function on your MacBook Pro, a few clicks will get you out of this mode.
Hover Over the Sizing Buttons
Start by moving your cursor up to the top of the screen, hovering the pointer until the sizing buttons appear at the top left of each window. There are three buttons: red, orange, and green.

Close or Resize the Window
Click the red button to close the window you’re in. Or, click the green button to exit the split-screen mode and resize your window. The other window may disappear, but don’t worry, it’s still open.
If you hit the yellow button, it will minimize the window to your dock.
The full-screen mode hides your other window, but it’s easily accessible by pressing the Mission Control button (F3) on the top row of your keyboard or by swiping up with three fingers on your trackpad.
Adjust the Window
Besides clicking the green button, you can also hover over the edge of the window until your mouse cursor changes to a double-sided arrow. Once it appears, click and hold, then drag to resize the window manually.
Conclusion
The split-view function can boost your productivity, whether surfing the internet or transferring information from one document to another. All it takes is a few simple clicks and tada, two screens. If you frequently use the function, you can even make your own keyboard shortcut.
Does the split-screen view on your MacBook Pro help you work more efficiently? Let us know in the comments below.
About Jonathon Jachura