


This site contains affiliate links. As an Amazon Associate, We earn a commission from qualifying purchases at no extra cost to you.
The easiest way to zoom in and out on your MacBook Pro is by pinching the trackpad to zoom in and reversing the motion to zoom out. However, you can use several other methods.
I’m Jon, an Apple and Mac expert and proud owner of a 2019 MacBook Pro. I zoom in and out on my MacBook Pro daily with various methods, and I made this guide to help you do it.
So, let’s learn all the ways to zoom in and out on your Macbook Pro.
How to Zoom In or Zoom Out on MacBook Pro
You can Zoom In or Zoom Out on your MacBook Pro using any of the below methods:
- Placing two fingers together on the trackpad and moving them closer or wider
- Using keyboard shortcuts to zoom
- Hover the cursor over a particular item on the screen and press the activation modifier
- hold the modifier key and scroll up using your external mouse to zoom in or zoom out
How to Zoom In or Zoom Out on MacBook Pro : 4 Best Methods
Method 1: Trackpad
The trackpad is a straightforward way to take advantage of the zoom function on your MacBook Pro. The process is simple, whether you want to zoom in or out.
- To zoom in: Place two fingers on the trackpad if you want to zoom in on an applicable screen. Drag your fingers away from each other in opposite directions. Release your fingers from the trackpad once you achieve the correct zoom level.
- To zoom out: The process is reversed to zoom out. Simply place two fingers on the trackpad, slightly away from each other. Then, using a pinching motion, drag your fingers towards each other. Remove your fingers from the trackpad once the screen reaches the appropriate level of zoom.
This pinch to zoom in and out method is the most intuitive. It works just like zooming in and out on an iPhone.
Method 2: Keyboard Shortcut
A simple keyboard shortcut is another way to zoom in and out on your Macbook Pro.
- To zoom in: Press the Command and + (plus) keys simultaneously. Use these two keys to adjust the zoom to your liking.
- To zoom out: Press the Command and – (minus) key at the same time.
Simply set up a few shortcuts to zoom in or out within the entire Mac screen. Here’s what you need to do:
Step 1: Click on the Apple logo in the top left corner of your screen.

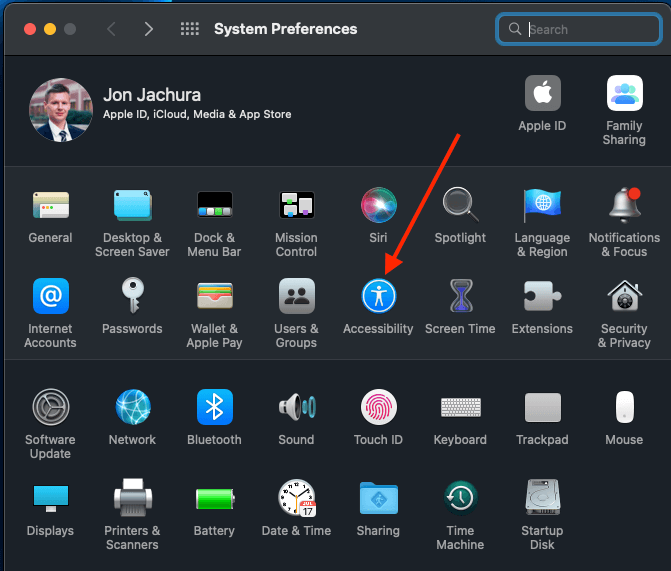
Step 2: In the drop-down menu, select “System Preferences (System Settings on macOS Ventura and above).” Click on the “Accessibility” icon to open the section.
Step 3: In the “Accessibility” section, click “Use keyboard shortcuts to zoom.” Check the box next to “Use keyboard shortcuts to zoom.”
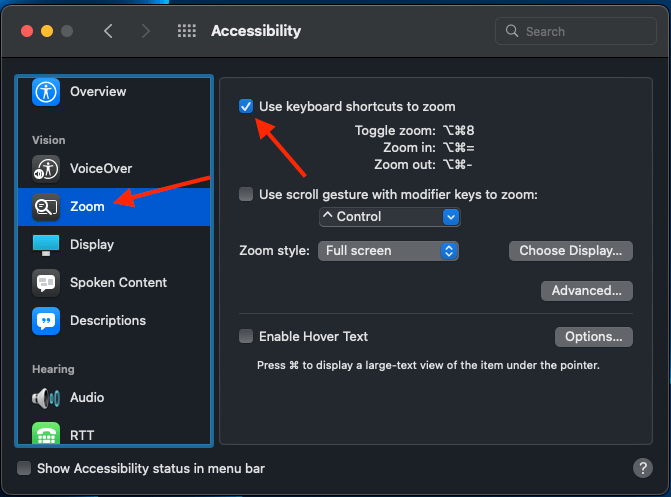
Step 4: Set the zoom-in function to the key combination Option + Command, and + (plus). Set the zoom-out function to the key combination Option, Command, and – (minus).
You can disable zoom using the key combination Option + Command + 8.
Method 3: Hover Text
Apple also includes a feature on the MacBook Pro called Hover Text, which allows you to zoom in on certain portions of the screen.
To use this function, simply hover the cursor over a particular item on the screen. Then press the activation modifier, which by default is the Command key.
If this function doesn’t work on your Mac, check your settings.
- Click on the Apple logo in the upper left corner of your screen.
- Select “System Preferences (System Settings on macOS Ventura and above).”
- Click on the “Accessibility” icon.
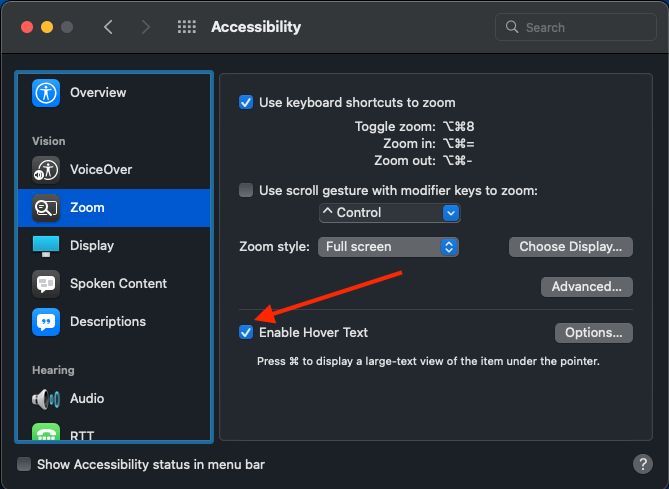
- Select “Zoom” in the sidebar of the “Accessibility” window.
- Check the box next to “Enable Hover Text.”
Method 4: External Mouse
If you have a mouse connected to your MacBook Pro, you can use it to zoom in or out. Simply hold the modifier key and scroll up using your mouse to zoom in. Or, hold the modifier key and scroll down to zoom out.
To activate this function or change the modifier key, follow these steps:
- Select “System Preferences (System Settings on macOS Ventura and above)” in the Apple menu.
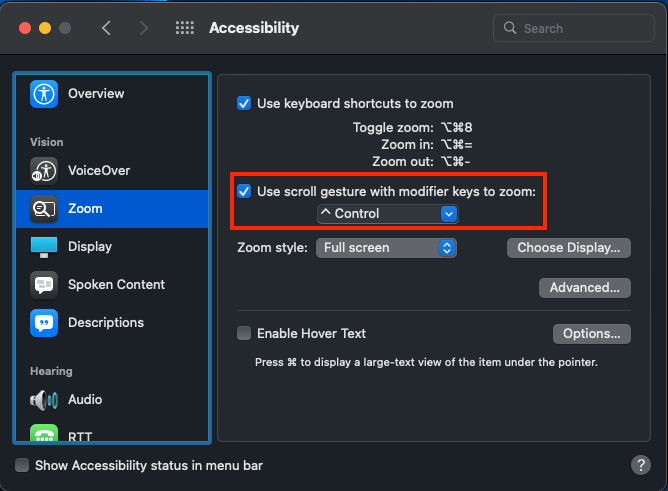
- Open the “Accessibility” section, then click “Zoom.”
- Check the box next to “Use scroll gesture with modifier keys to zoom.”
- Select a modifier key: Command, Control, or Option.
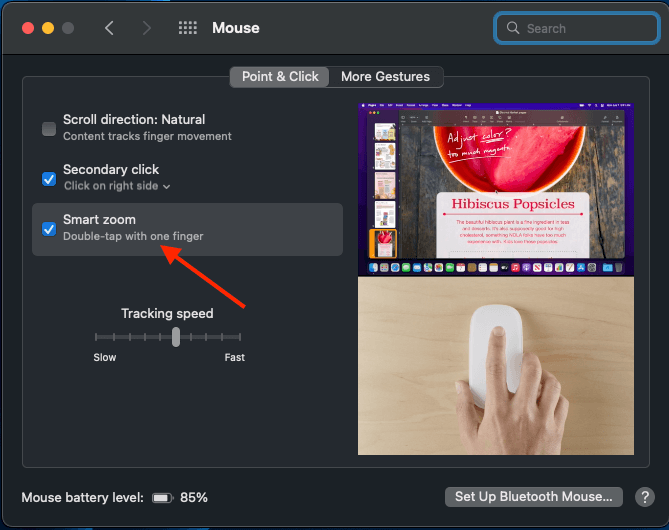
Alternatively, you can also zoom in or out using an Apple Magic Mouse. You can enable the Smart zoom feature, which allows you to zoom using a double-tap. To zoom in or out, simply double-tap with one finger.
Here are the steps to activate the feature:
- Select “System Preferences (System Settings on macOS Ventura and above)” from the Apple menu.
- Click “Mouse” to open the section.
- Select the “Smart zoom feature.”
FAQs
Why is my Mac stuck on zoomed in?
Your Mac might be stuck on zoomed-in because you’ve updated the software to the newest version or because you’ve reinstalled macOS.
How do I get my screen back to normal size on a Mac?
To get your screen back to a normal size on a Mac, go to System Settings, then click on Displays. Go through the display settings and choose the settings you want, and you should see your screen return to its normal size.
Conclusion
Sometimes, you may need to enlarge or minimize all or part of your MacBook Pro screen. Whether you need to zoom in on the entire Mac screen or a small portion of text, the process is quick and easy; just use one of the methods above. All it takes are a few short steps to enable, activate, or use the zoom function.
What is your go-to way of zooming in on your MacBook Pro?
About Jonathon Jachura