


This site contains affiliate links. As an Amazon Associate, We earn a commission from qualifying purchases at no extra cost to you.
Want to capture entire web pages or documents in a single scrolling screenshot on your Mac? This article covers native and third-party methods to take long screenshots without fragmentation.
Key Takeaways:
- Use QuickTime Player, Safari, Chrome, or Preview to capture scrolling screenshots on a Mac.
- Third-party apps like Snagit, Lightshot, and Skitch provide extra functionality like editing tools.
- On an iPhone with iOS 13+, take scrolling shots by pressing side/volume buttons and selecting Full Page.
- Copy text from screenshots on macOS Monterey using Live Text in Preview or Safari.
- Take full page screenshot on Firefox/Chrome using built-in features or extensions.
Top Native Ways To Take Scrolling Screenshots
You probably know about the trusty old Shift + Command + 3 and 4 keyboard shortcut that lets you capture your screen or a part of it. But what if you must capture something beyond your screen’s limits?
Fear not, my friend! There are several ways of taking scrolling screenshots on Mac, so let’s walk through them.
1. QuickTime Player
QuickTime Player is a multimedia player and screen recording software application developed by Apple Inc. It also includes basic editing features, such as trimming and merging video files, and the ability to record entire screen button of your Mac.
Here are the steps to take a scrolling screenshot using QuickTime Player:
- Open QuickTime Player from the Applications folder or search for it in Spotlight.
- Click File in the menu bar and select New Screen Recording.
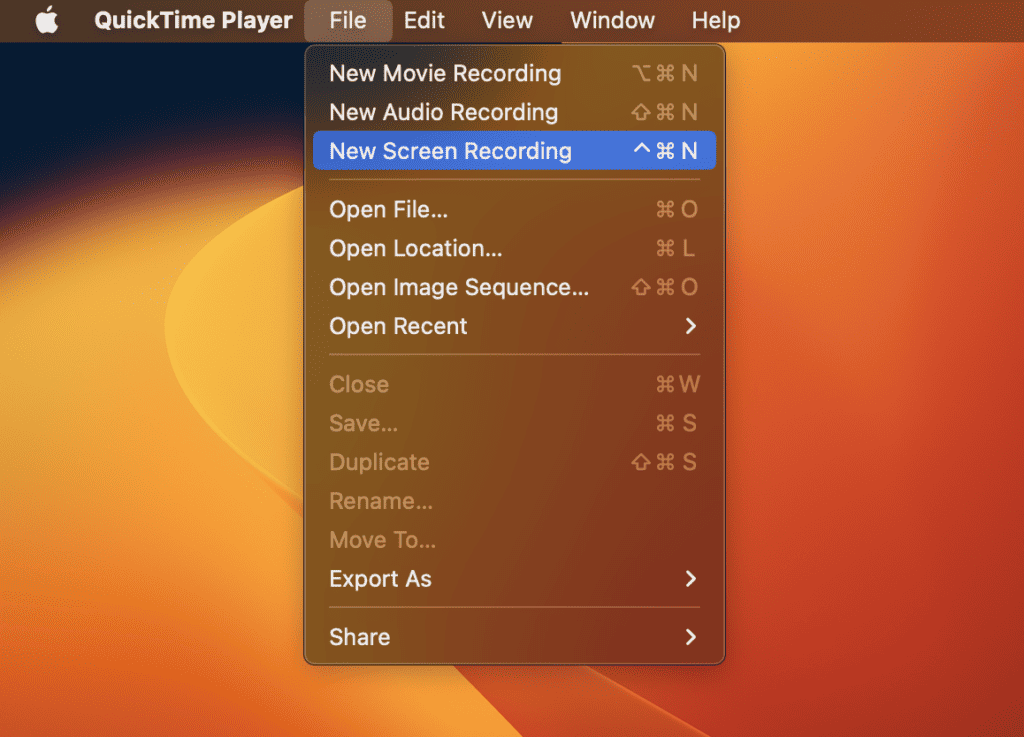
- Click the drop-down arrow next to the record button and select None under the microphone option.
- Click on the red record button and select the area of the screen you want to capture.
- Once you have selected the area, click the Start Recording button to start screen recording.
- Scroll through the page or document you want to capture.

- Once you have reached the end of the page, click on the stop button in the menu bar.
- The recording will automatically be saved as a .mov file. To save it as an image file, open it in Preview and select File, followed by Export. Choose the desired image format and save it.
2. Safari
Safari is not just a web browser but also allows you to take scrolling screenshots. This method is especially useful for capturing entire web pages beyond the visible area.
- Open Safari and navigate to the web page you want to capture.
- Press the keyboard shortcut Command + Shift + 5 to open the Screenshot tool.
- In the Screenshot tool, click the Options button and select Capture Entire Page from the drop-down menu.
- Click the Capture button to start the scrolling screenshot capture process.
- Safari will automatically screen scroll through the web page and capture the entire page length of the browser window.
- Once the capture process is complete, the screenshot will appear in the bottom right corner of your screen.
- Click the screenshot preview to open it, then use the editing tools to make any necessary adjustments or annotations.
- Save the scrolling screenshot to your desired location by clicking on the Save button in the top right corner of the screenshot preview window.
3. Chrome
This method is easy and useful if you need to take a scrolling screenshot of a web page in Chrome. However, it requires you to install a third-party extension, Full Page Screen Capture, which may be better for some users. If you don’t have any issues with it, Here are the steps:
- Open Google Chrome on your Mac and go to the Chrome Web Store.
- Search for Full Page Screen Capture and click Add to Chrome to install the extension.

- Navigate to the web page you want to take a scrolling screenshot of.
- Click on the Full Page Screen Capture icon in the toolbar.
- The extension will automatically start capturing the entire webpage, and you will see a scrolling screenshot preview.

- Once the capture is complete, you can save the screenshot to your computer or share it directly.
4. Preview
Preview is a built-in app on Mac that allows you to view and edit images and PDFs. It also can capture screenshots. Here are the steps to take a scrolling screenshot using Preview:
- Open Preview from the Applications folder or Spotlight search.
- Go to File > Take Screenshot> From Entire Page.
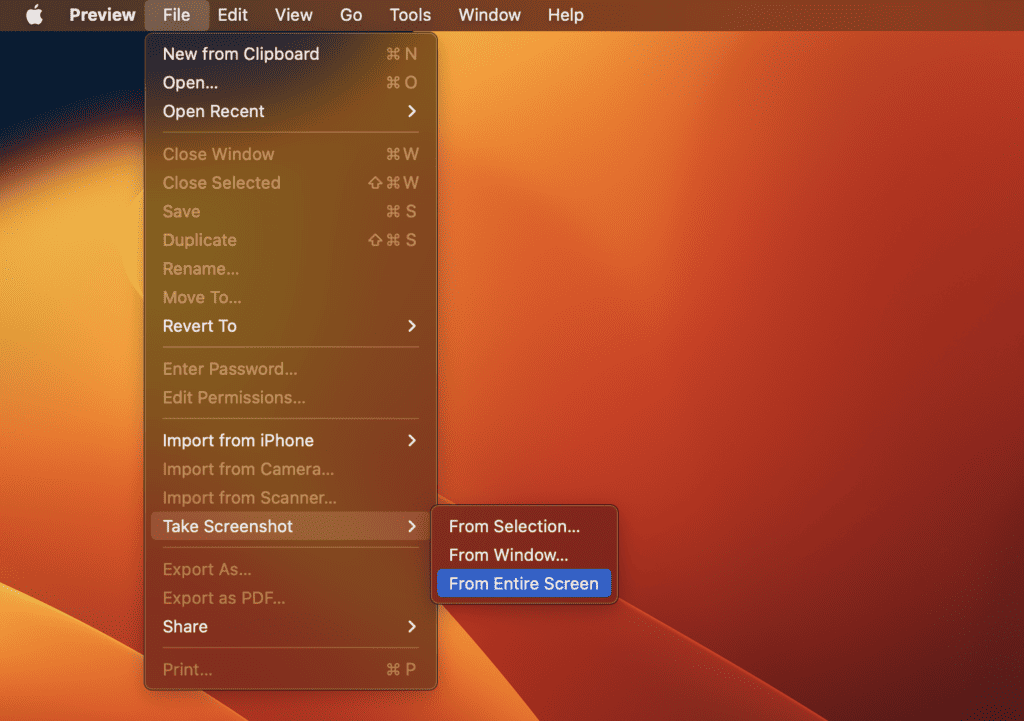
- Preview will then automatically take the screenshot and display it for you to edit or save.
You can then edit or annotate the screenshot and save it in your desired format.
Top 3 Third-Party Apps For Scrolling Screenshots
There are several apps available that allow you to take scrolling screenshots. But the three we recommend below are the best and safest ones for Macs. On top of that, they offer some extra features too.
1. Snagit

Snagit is a powerful third-party app that captures scrolling screenshots, videos, and audio. It is a paid app with a one-time purchase price of $49.99 for the individual license and discounts available for volume purchases. The app also offers a free trial period. It provides an intuitive user interface and customizable capture settings that enable you to capture any screen part.
To take a scrolling screenshot using Snagit, follow these steps:
- Open the app.
- Select the Capture button.
- Choose the All-in-One option.
- Select Scrolling Window.
After that, Snagit will capture the entire length of the page or window and save it as an image file.
2. Lightshot

Lightshot is a simple yet effective third-party app that allows you to capture screenshots of web pages or applications. It’s free and can be used on both Mac and Windows platforms. I have used it and personally found it a little slow.
To take a scrolling screenshot using Lightshot, you need to take these steps:
- Open the web page or application you want to capture.
- Click the Lightshot icon on your toolbar.
- Select the Capture Scrolling Window option.
- Scroll through the page.
Lightshot will capture the entire length of the page and provide you with editing options before saving the image.
3. Skitch

Skitch is a third-party app developed by Evernote that allows you to capture and annotate screenshots. It’s available for free and provides an easy-to-use interface with a variety of annotation tools.
Here’s how to take a scrolling screenshot using Skitch:
- Open the app.
- Select the Screen Capture button.
- Choose the Capture Scrolling Window option.
- Scroll through the page. Skitch will capture the entire page length and allow you to annotate it before saving it as an image file.
If you don’t want the complexity of native solutions or the hassle of downloading apps, you can use two online screen capture tools: Screenshot Guru and Visualping.
Frequently Asked Questions
Here are some common questions to add to your knowledge.
How do you take scrolling screenshots on an iPhone?
To take a scrolling screenshot on your iPhone, it needs to have iOS 13 or above. Take a screenshot (press the side and volume up buttons together), tap on the thumbnail in the bottom-left corner, and choose Full Page.
You can scroll through it using the bar on the right side and do some quick editing. Note that this file is saved in PDF format rather than PNG.
Note: this scrolling screenshot feature only works on native Apple apps.
Can you copy text from a scrolling screenshot?
If you’re using macOS Monterey, you can access Live Text in Preview and Safari. It means you can copy and use the text in an image. Just position the pointer over the text you want to copy and then drag it to select it. There are also OCR (Optical Character Recognition) apps like Prizmo and TextSniper, which you can check out.
How to take full webpage screenshots with Firefox and Chrome on macOS?
You can still take full-webpage screenshots if you don’t use Safari as your primary browser. Firefox has an in-built feature to do it. For Chrome users, you can get the GoFullPage extension. It’s free and takes full webpage screenshots.
Conclusion
Taking a scrolling screenshot on your Mac is a real-time-saver, trust me. You can either stick with macOS’s built in screenshot tool or try some fancy third-party apps. Personally, I’m all about native solutions, but you do you! Find the best tool for you and start capturing epic scrolling screenshots.
And remember to share your preferred method in the comments below.
About Devansh Kamdar