


This site contains affiliate links. As an Amazon Associate, We earn a commission from qualifying purchases at no extra cost to you.
It can be tempting to get distracted by the excitement of the latest MacBook Pro (with Touch Bar and SSD), hey who doesn’t? But, have you ever thought about how to properly deal with your old MacBook?
Whether you’ve decided to sell it on a marketplace for most cash, kindly donate it to a charity, or simply give it away as a gift to a friend or a relative.
There are some additional steps you should take with your old Mac for the sake of data privacy and security, and of course, more cash if you decide to sell it.
We’ve outlined all the steps and tips here. But hey, it’s up to you about which one(s) to implement.
Let’s get started!
Step 1: Set up your new Mac first
You’ve spent several years working on the old MacBook. You have likely downloaded dozens of cool applications and, more importantly, you are used to all the system preferences either with the system or the applications.
Setting up your new Mac with your old one handy would eliminate a lot of unnecessary headaches. For example, if you are not sure why the multi-touch trackpad doesn’t work the way you want, just open your old Mac and copy all the user settings under System Preferences (System user settings on macOS Ventura and above) > Trackpad.

Step 2: Back up and transfer important data
In the digital age, data is irreplaceable. The last thing you want to see, when you are searching for your new MacBook for some documents or photos, only to find that they were stored on (or have possibly been wiped out from) your old Mac.
So go ahead and backup your data — if possible make multiple copies as you sure don’t want to risk losing the only one.
There are several backup options you can choose.
- The easiest way is to set up Time Machine — follow this article for a step-by-step guide.
- The safest way is to transfer all your files and folders into an external hard drive. Don’t have one? check our list of the best external drives for MacBook.
- You can also backup your data to the cloud, with the help of an online backup service like Google Drive, Microsoft OneDrive, etc.
Step 3: De-authorize sensitive Apple accounts
If you used iCloud on your old MacBook, take a minute to de-authorize it.
It’s not that the new owner might steal your music, but Apple has device limitations associated with your Apple ID — maximum of five computers and up to ten devices including iPads and iPhones on one Apple ID. Learn how to de-authorize via this official Apple guide.
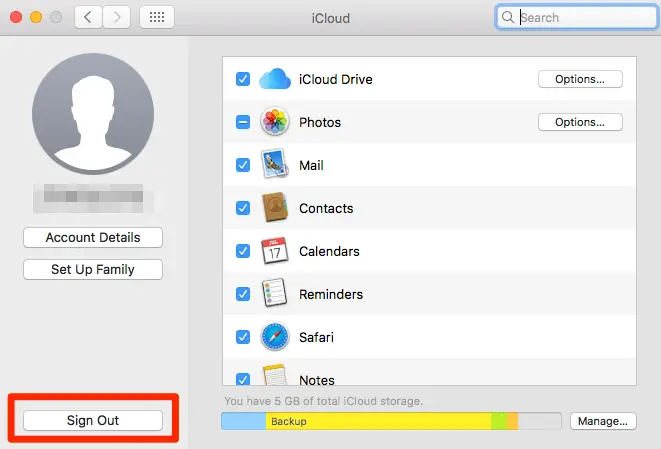
Meanwhile, if you used other Apple services like iCloud, iMessage, etc., it is recommended that you sign out of those on your old MacBook as well. For example, to sign out iCloud go to “System Preferences (System Settings on macOS Ventura and above)”, click “iCloud”, and click the “Sign Out” button on the bottom left corner.
Step 4: Erase the hard drive completely
You never know who will get your old MacBook, especially when you donate or sell it. Even trashed files can be recovered from Mac, so you probably want to permanently wipe the MacBook drive clean — making all the data beyond recovery.
Some Apple MacBooks are equipped with an HDD (Hard Disk Drive), and some with an SSD (Solid State Drive). Match your old Macbook’s configuration with the appropriate following solution.
Read More: How to Reset Your MacBook
Step 5: Reinstall macOS
Depending on the way you recycle your old MacBook, you may or may not need to reinstall the system. If you donate or give it away, the new owner who gets the machine would probably expect to use it immediately, thus it’s good etiquette to reinstall macos(factory reset).
If you sell your old MacBook, it’s best not to reinstall macos because the buyer may have a personal preference as to which version to install, or prefer to install himself/herself. It’s best to secure the buyer first before going forward.
Usually, the reinstallation process is included in step 4 (see above) when you finish wiping Mac hard disk. You’ll be instructed to click an option “Reinstall macOS”. Install it following the instructions. If everything goes well, a new fresh copy of macOS can be downloaded and installed on your computer.
When the installation is successful, you’ll be prompted to a screen to enter your Apple ID information. Stop here and that’s it.
Step 6: Clean it up
As a courtesy to the second-hand user, take a few minutes to clean up your MacBook. Clean up the Mac Logo. Try your best to remove any dust or dirt until it looks shiny again. Though it only takes a few minutes, this step could help boost resale value if sell it. Check out our guide on the best screen cleaner for MacBook.
Step 7: Don’t forget to take pictures
If you want to sell it, on eBay for example, product photos can make or break the deal. That’s why it’s super important to go through the previous step first, then use your professional digital camera (don’t have one? ask a photographer friend) to shoot several pictures.
Plus, those photos will recall your best memories of your old MacBook — as it’s accompanied and assisted you in many ways.
Step 8: Put it back into the box
If you can find the original Apple package, that’s even better. Put your old MacBook in and seal it. Give the receiver a surprise!
That’s it. How do you like all the above steps? Do you find them helpful when you decide to sell your old MacBook? You don’t have to follow each of the steps, but check off as many as you can.
About Lorena