


This site contains affiliate links. As an Amazon Associate, We earn a commission from qualifying purchases at no extra cost to you.
Screenshots are often filled with unnecessary graphics, or they may have some sensitive information that you don’t want to share with others. But then going back to the gallery and editing them can seem like such a hassle. Editing screenshots on Mac doesn’t have to be hard– and that’s just what you’re going to learn in this guide, so read on.
How to crop a screenshot on Mac [Best Method]

The best way to crop a screenshot on Mac is by using the in-built tool. When you take a screenshot, a thumbnail appears at the bottom-left of the screen. Click it to open the in-built tool. Now, press the crop icon to edit your image and click Done.
Remember that the thumbnail appears right after you take a screenshot and stays for a few seconds. You must click it within that window of time because it won’t come back once it is gone. Besides using the built-in tool, you can crop your screenshots through Preview or Photos app or third-party tools.
Also, If you wish to know how to record MacBook Pro screen. Here is the guide for you!
Essential keyboard shortcuts for taking Mac screenshots
Some keyboard shortcuts for taking screenshots on Mac are Shift + Command + 3, Shift + Command + 4, and Shift + Command + 4 + Space bar. These shortcuts can help you take screenshots on Mac quickly.
There are various methods to take a screenshot on Mac, but the best one is using a keyboard shortcut, as all you need to do is press a few keys. You can take a full screen-capture, or partial-screen capture, or capture objects on the screen without background.
Let’s see different key combinations to take screenshots on your MacBook quickly.
- Press Shift + Command + 3 for a full-screen capture.
When you follow this combination, your entire screen will be captured. The screenshot will include any dialog box opened, menu bar, dock, etc.
- Press Shift + Command + 4 for a partial-screen capture.
After following the key combination, take the cursor to where you want to start taking the screenshot. Click the mouse button and drag the cursor diagonally till you cover everything you want to capture, then release it to take the screenshot.
- Press Shift + Command + 4 + Space bar to take a screenshot of a window or menu without the background.
This method is great for capturing objects without the background, such as icons, menu bar, and dialogue boxes. After you press this key combination, a light blue area with a camera in its center will appear on the screen. You can move the mouse, and the part of the screen will turn blue where you hover the cursor. Click the object to take a screenshot without any background.
Every time you capture a screen, a camera shutter sound will indicate the screenshot is taken. A floating thumbnail will appear on the screen, clicking which will save the file. Now, let’s see how you can crop.
How to Crop a Screenshot on a Mac [Using in-built tool]
One of the most convenient ways to crop a screenshot is to use the in-built tool. When you take a screenshot, a floating thumbnail of the screenshot appears in the bottom-right of the screen. The thumbnail stays there for a few seconds before it goes away. If you want to crop a screenshot using the in-built tool quickly, you need to click the thumbnail instantly. Remember that you cannot find it again if you miss it.
After clicking the thumbnail, the screenshot will open in the in-built editor. You can crop it by following these steps:
- Press the crop icon at the top-right of the screen.
- Crop the screenshot by selecting the area you want to capture. Next, drag the crop handles at the corners of the rectangle to adjust the screenshot. The area within the rectangular lines will be selected, and the rest will be cropped out.
- Once you select the area to crop, click Done in the top-right corner.
How to Crop a Mac screenshot with the Preview App
Generally, we use the Preview app to view images on Mac, but you can also crop screenshots with it. Double-clicking any image on your Mac will automatically open it in the Preview app.
Here’s how you can crop a mac screenshot with the Preview app.
- Double-click a screenshot to open it in the app.
- Find the Show Markup Toolbar button in the top menu bar. Depending on your Mac, the tool can have a pencil tip icon or a toolbox icon.

- When you click the tool, a plus sign will appear on the screen. Left click the mouse button and drag the cursor (plus sign) diagonally till you cover everything you want to crop. Release when you are done.

- A rectangle marked with blue dots will appear on the area you select for cropping. Remember that everything inside the rectangle will be included, while the rest will be cropped out.
- Next, select Crop to Selection on the menu bar to crop the image.

The screenshot will be cropped. Make sure to save the image before closing the app. Otherwise, you will lose the edited image.

How to Crop a Screenshot Using the Photos App
Just like the Preview app, you can crop a Mac screenshot using the Photos app. Open the screenshot directly in the app or first launch the app and then import the image.
In either case, here’s how to crop a screenshot using the Photos app.
- As mentioned earlier, the saved file will appear on the desktop when you save a screenshot. Right-click the saved screenshot > Open With > select Photos. If you don’t see the app there, select Open with > Other > find and click Photos.

- You can also drag and drop a screenshot directly into the app. Open the Photos app and go to Imports. Select the file you wish to crop and drag it to the empty area, and your screenshot will be added to the app. Double-click the file > Edit in the top-right corner.

When your screenshot opens in the Photos app, you can crop it by following these steps:
- Select the Crop tab on the top bar.
- Adjust the image size and proportions by dragging the sides and crop handles.
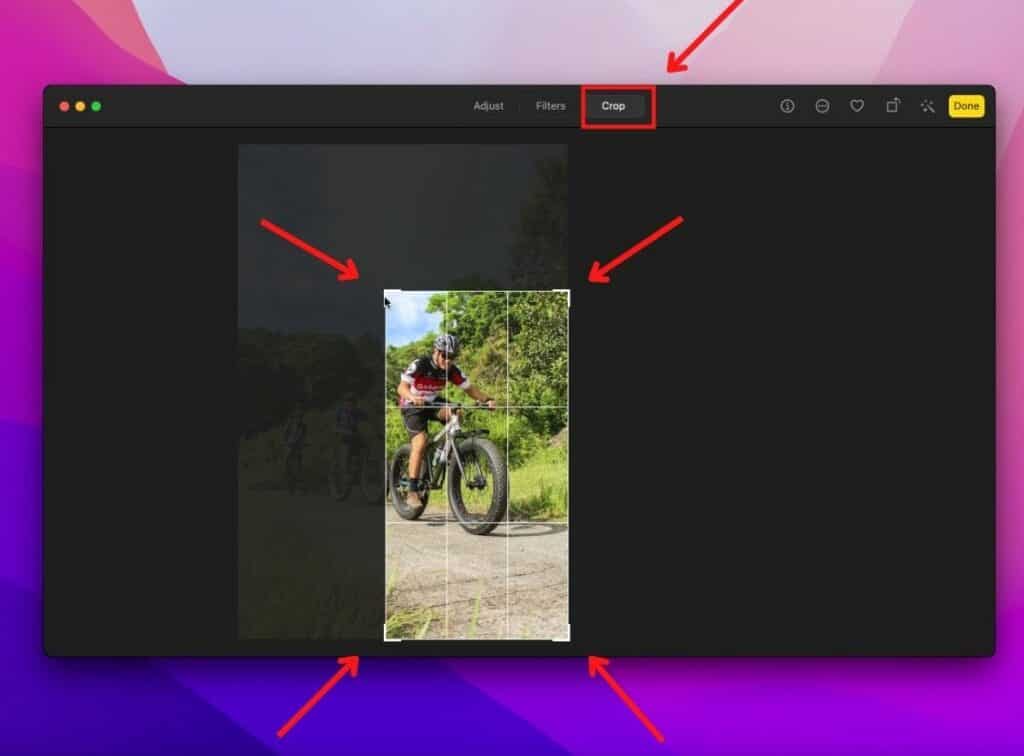
- Once done, select Done at the top-right corner.

How to Crop With a Screenshot with Third-Party Tools
The Preview or Photos are apps on Mac, but you can also crop your screenshots using third-party tools. Note that you will first need to download these tools to your Mac.
Some of the best third-party tools you can use to crop screenshots on your Mac are Skitch, Adobe Lightroom, Polarr, and Pixelstyle Photo Image Editor.
Here’s how to crop a screenshot on Mac using Skitch.
- Download Skitch and install the program on your MacBook.
- In the app, select the drop-down arrow next to Screen Snap at the top of the screen.
- Click Open an image or PDF.

- A window will open. Find and select the screenshot you want to edit.
- After the screenshot is added to the app, select the crop tool in the left bar.

- Adjust the cropping dimensions by dragging the sides and crop handles.

- When you are done, select Apply at the top-right of the screen. The image will crop according to your selection.

- Next, to save the file, click the share button in the top bar and select Add to Photos.

The cropped screenshot will now be saved in the Photos app.
How to Crop With Online Tools [Third Party Tools]
You can crop images and screenshots using online apps if you don’t want to download one on your Mac. Many online tools like Photopea, Picresize, Cropp.me, or ResizeImage allow you to edit your files online without involving complex installation processes.
Let’s see how to crop a screenshot on Mac using one of the third-party online tools like Photopea.
- Visit Photopea.com.
- You might see a welcome screen describing different features of the tool. Close it by clicking the cross on the top right.
- Photopea allows various methods to import files, and you can use any of the following to add a screenshot:
- Click Open From Computer right below the tool name. Find the required image and select Open.

- Click File at the top left corner of the screen and select Open. Find the screenshot you want to crop > Open.

- On your MacBook, go to the folder where the image is located. Drag and drop it in the Drop any files here area in Photopea.

- Once you open the screenshot on Photopea, select the crop tool in the left bar.

- Adjust the cropping area by dragging the sides or crop holders.
- When you are done, click the tick mark located at the second menu bar at the top.

- Click File > Export as > select the required format.

- Finally, click Save to download the image.

How to Crop a Screenshot on Mac after Saving
You can edit your screenshots after saving them on the MacBook by using both built-in and third-party apps. For instance, you can use the Preview or Photos app to crop the screen capture quickly. Else, third-party tools also allow you to crop images and screenshots.
First, let’s see how to crop a screenshot after saving using the Preview or Photos app:
- Open the screenshot in the Preview or Photos app.
- Select the editing tool. In the Preview app, it will be the Show Markup Toolbar in the top menu bar. Drag the plus sign to cover the area you want to crop. In Photos, go to Edit > Crop.
- Edit the image size by adjusting the crop handles and sides.
- In the Preview app, navigate to the menu bar > Crop to Selection to crop the image. In the Photos app, select Done to crop the image.
Now, let’s see how to crop a screenshot after saving using third-party tools.
- You will need to download the third-party tool. If you want to crop online, visit the tool’s website.
- Open the screenshot in the installed software. Likewise, add the image to the online tool.
- Select the crop tool and resize the image.
- Save the cropped screenshot by clicking File > Save As.
But some times croping screenshot results in low image quality so you can use third party software to enhance the image quality.
HitPaw Photo Enhancer
When it comes to cropping a screenshot on your Mac, having the right tools can make the process smoother and more efficient. One such tool is HitPaw Photo Enhancer, a powerful photo enhancement software that operates with minimal system usage and delivers fast results. Not only does HitPaw Photo Enhancer allow you to quickly crop and edit your screenshots, but it also offers advanced features to enhance and enlarge your images without losing quality.
This makes it an excellent choice for users who need to refine their screenshots for presentations, tutorials, or personal use. The user-friendly interface ensures that even those with minimal editing experience can achieve professional-looking results effortlessly. With HitPaw Photo Enhancer, you can enhance and resize your screenshots efficiently, making it a valuable addition to your Mac’s toolkit.
Do you wish to know how to take scrolling screenshot from Mac? Read the full content here.
Conclusion
Editing your screenshots using Mac’s in-built tool is one of the easiest ways to crop screenshots. However, sometimes you may miss clicking the thumbnail, which may vanish. In that case, to save yourself the hassle of retaking screenshots, you can use other built-in apps like Preview or Photos to edit your images.
You can also download third-party tools or edit screenshots using online editors. Both are excellent, but online editors let you crop images anytime, anywhere. However, an installed editor will be handier if you have a slow internet connection.
About Devansh Kamdar