


This site contains affiliate links. As an Amazon Associate, We earn a commission from qualifying purchases at no extra cost to you.
We’ve all been there: wanting to uninstall McAfee on Mac but finding the process more complex than expected.
Software like McAfee, while beneficial for many users, can sometimes become challenging to remove due to intricate files and configurations specific to macOS.
How to Uninstall McAfee on Mac: The Quick Answer
To swiftly uninstall McAfee from your Mac, navigate to your Applications folder, find the McAfee product you wish to remove, drag it to the Bin, and empty the Bin. This method will delete the app but might leave some residual files, but it’s the quickest route to declutter your system.
For a more comprehensive removal ensuring no leftover files remain, you must follow a detailed step-by-step process. Let’s dive into it in the sections below.
Why the difficulty? The design of certain antivirus solutions is intended to deeply embed within your system to provide maximum protection.
However, in this article, we’ll show you how to uninstall McAfee on Mac in a step-by-step tutorial, offering multiple solutions to ensure you can effectively remove McAfee from your Mac.
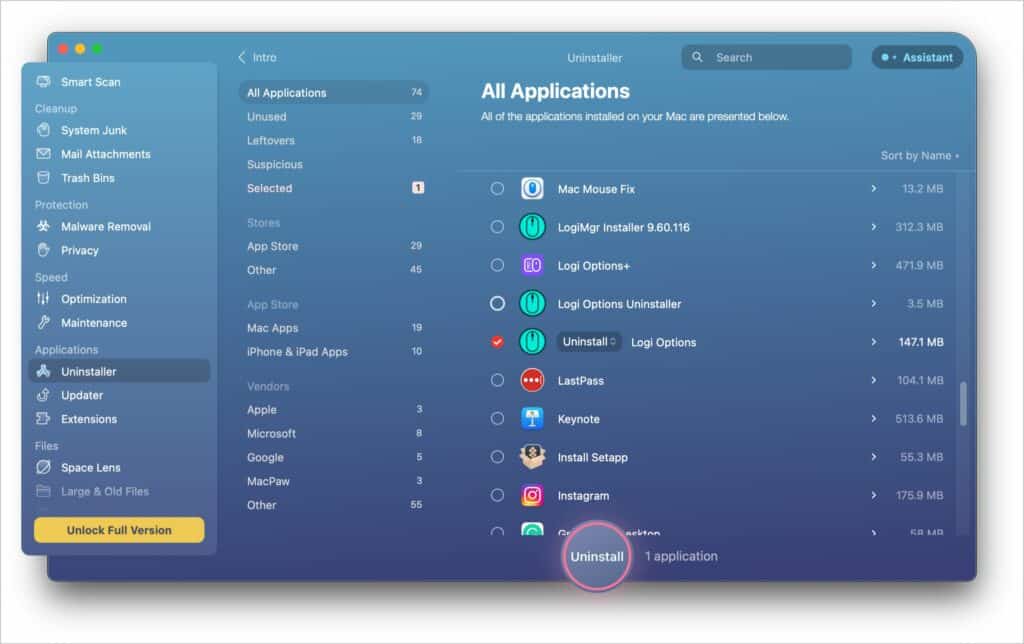
Thanks to CleanMyMac, uninstalling McAfee from your MacBook has never been easier. This software helps you get rid of any app along with all of its files. One of the best features of CleanMyMac is that its makes the uninstalling process extremely simple, so download it now.
What Is McAfee and Why to Remove It from Your Mac?

McAfee is one of the leading antivirus and cybersecurity software brands worldwide.
Founded by John McAfee in 1987, it offers a suite of products that provide protection against malware, phishing attacks, spyware, and other online threats.
The software acts as a shield, scanning and blocking suspicious activities, ensuring your data remains safe and your digital experience is smooth.
However, there may come a time when you want to remove McAfee from your Mac. You can have many reasons to do so, some of which are as follows:
- Performance Issues: Some Mac users have noticed a decrease in system performance after installing McAfee. This slowdown can be due to the software constantly scanning and running in the background, consuming a significant chunk of system resources.
- Software Conflicts: If you have other security software installed, McAfee might conflict with them. Such conflicts can result in software crashes, system hangs, or decreased protection.
- Transition to Another Antivirus: Perhaps you’ve decided to shift to another antivirus solution that’s more tailored to your needs or offers features McAfee doesn’t.
- Redundancy: Modern macOS versions come with a robust built-in security framework. Some users feel that having an additional antivirus may be redundant, especially if they follow safe browsing habits and regularly update their system.
- Subscription Costs: McAfee operates on a subscription model. If you no longer wish to renew or feel you aren’t getting value for money, uninstalling it can prevent auto-renewal costs.
In any case, if you’ve decided McAfee isn’t for you, it’s essential to ensure you remove it completely to avoid lingering files or potential conflicts with other apps.
What to Do Before You Uninstall McAfee on Mac

Before uninstalling McAfee on your Mac, it’s imperative to take a few preparatory steps to ensure a smooth removal and safeguard important data.
Here’s what to do before you uninstall McAfee on your Mac:
- Backup Important Data: As with any major software changes, it’s always a good practice to back up your data. Use Time Machine or another preferred backup method to ensure you don’t lose essential files.
- Ensure You Have the Login Credentials: If you ever decide to reinstall McAfee, having your login credentials handy will simplify the process. Save them in a safe location.
- Turn Off Real-time Scanning: Disable McAfee’s real-time scanning feature to prevent the software from running tasks while you’re trying to uninstall it. This can usually be done within the McAfee dashboard or preferences pane.
- Close All Active Applications: To avoid software conflicts, close any apps running in the background. This ensures a smoother uninstallation process.
- Connect to a Stable Internet Connection: Some uninstallers might require an internet connection to complete the process, especially if they have to communicate with a server to deregister the device or deactivate the software license.
- Gather Necessary Uninstall Tools: While dragging the app to the Trash is one method, there are specific uninstaller tools provided by McAfee or third-party apps that can help ensure a cleaner removal. Check if you have these tools or if you need to download one.
After taking these preliminary steps, you’re all set to go through the uninstallation process with minimized risks and disruptions. Let’s walk through the detailed steps to ensure McAfee is completely removed from your Mac.
How to Uninstall McAfee on Mac
Navigating the process of uninstalling McAfee on your Mac might seem daunting, but by following this detailed guide, you’ll have a clutter-free system in no time. Here’s a step-by-step breakdown to thoroughly remove McAfee from your Mac:
Step 1: Uninstall McAfee
There are two methods to uninstall McAfee on your Mac which we’ve explained below.
a. Via Terminal
The Terminal might seem intimidating to some, but it’s an incredibly powerful tool that can expedite many processes on your Mac.
In the context of uninstalling software like McAfee, it provides a direct method, cutting through layers of GUI-based actions. Here’s how to use Terminal to uninstall McAfee:
- Open the Terminal application (you can find it in Utilities or search for it using Spotlight).

- Enter the respective command from the following based on the version you’re using and press Enter:
For McAfee Antivirus version 5.0 or newer: sudo/Library/McAfee/cma/scripts/uninstall.ch

For McAfee Antivirus version 4.8 or older: sudo/Library/McAfee/sma/scripts/uninstall.ch

- Provide your administrator password when prompted.
- Follow the on-screen instructions until the process is complete.
- Restart your Mac when the removal process is complete.
b. Using the Uninstaller File
Most software suites, recognizing the varying comfort levels of their users, often include dedicated uninstallers. These tools are crafted to ensure the software is removed as thoroughly as possible, without you having to navigate the intricacies of system folders or commands.
McAfee, being a seasoned player in the cybersecurity domain, offers such a utility for a streamlined uninstallation experience. Let’s guide you through its use:
- Navigate to the Applications folder via Finder.

- Look for the McAfee folder and open it.
- Double-click the McAfee Uninstaller file. It should be labeled something like McAfee Total Protection Uninstaller.
- Enter your admin username and password and click OK.
- Follow the prompts to complete the uninstallation process.
- Click Finish after the uninstallation is complete.
Step 2: Remove McAfee Leftover Files
Now that the main components are gone, there might still be some lurking shadows—leftover files that aren’t immediately visible but can clog your system over time.
Follow these steps to completely remove McAfee leftovers from your Mac:
- From the Finder menu, click Go and select Go to Folder.

- Type the following paths one by one and press Enter:
/usr/local/
/Library/Application Support/
/Library/LaunchAgents/
/Library/LaunchDaemons/
- Search for any folders or files related to McAfee and move them to the Bin.
- Repeat the process for all paths.
- Don’t forget to empty the Bin to ensure all files are completely removed.
Step 3: Uninstall McAfee Extension (Web Control)
Browser extensions are nifty tools that enhance our online experience.
McAfee also installs a Safari extension, Web Control, by default which can remain active even after you’ve uninstalled the main software.
Here’s how to remove the McAfee extension from Safari:
- Open Safari on your Mac.
- Click Safari in the menu bar and select Settings.

- In the new window, navigate to the Extensions tab.

- Locate the McAfee Web Control or any related McAfee extensions.
- Click the extension in the left sidebar and tap the Uninstall button on the right side.

Step 4: Empty the Bin
After uninstalling McAfee app, its leftover files, and Safari extension, don’t forget to empty the Bin.
To do that, you can open the Bin from your Dock and select all McAfee related files and delete them permanently.
Alternatively, right-click the Bin icon in the Dock and select Empty Bin.

And that’s all it takes to remove McAfee and its associated files from your Mac.
How to Automatically Uninstall McAfee on Mac
While manual methods offer more control, they might not be everyone’s cup of tea. Automatic uninstallation methods provide a more streamlined approach, cutting down on the time and intricacies involved.
Thankfully, for those who prefer a hands-off approach, there are reliable third-party apps to automatically uninstall McAfee from a Mac.
These utilities dive deep into the system, ensuring no residual files remain.
Here are the general steps to use a third-party app to uninstall McAfee and its associated files from Mac automatically:
- Download and install a reputable third-party uninstaller. Popular choices include CleanMyMac X, AppCleaner, and AppZapper.
- Launch the chosen uninstaller and look for McAfee in its application list.
- Select McAfee and follow the prompts or instructions provided by the uninstaller tool to remove the software.
By the end of this process, McAfee should be completely removed from your Mac.
As always, after uninstalling any software, it’s a good habit to restart your Mac to ensure all changes are appropriately implemented.
Why Can’t You Uninstall McAfee on Mac?

At times, you may encounter obstacles when attempting to uninstall McAfee from your Mac.
This can be quite perplexing, especially when other software seems to uninstall without a hitch.
Understanding the root causes behind these challenges can help your troubleshoot the issue with ease.
Let’s explore some common reasons for McAfee failing to uninstall on your Mac:
- Active Processes: McAfee, being a security software, constantly runs background processes to monitor and protect your system. If any of these processes are active during an uninstall attempt, they can prevent the software from being removed.
- Incomplete Installation: If McAfee was not installed correctly in the first place or the installation was interrupted, it might not uninstall properly. Missing or corrupted files can hinder the uninstallation process.
- Administrative Restrictions: Some Mac settings, particularly in business or institutional environments, may restrict uninstallation of certain software without administrative permissions. This is done to prevent unintentional removal of critical software.
- Residual Files: Even if you’ve partially removed McAfee, residual files can still lurk in the system. These leftover files might cause the system to think the software is still installed, hence obstructing further uninstallation attempts.
- Browser Extensions: McAfee’s browser extensions, like Web Control, can sometimes remain active and prevent the complete removal of the software. They need to be addressed separately.
- Software Conflicts: Other software on your Mac, especially those related to system optimization or security, might conflict with McAfee, causing uninstallation issues.
Understanding these potential barriers is the first step in resolving them. Once identified, targeted solutions can be applied to ensure McAfee is thoroughly removed from your Mac. If you’re facing such issues, a systematic approach—ensuring all processes are halted, gaining proper permissions, or using dedicated uninstallers—often yields the best results.
Frequently Asked Questions
Is McAfee safe?
Yes, McAfee is safe. It is designed by a reputable cybersecurity company with decades of experience. Their products, including antivirus and internet security solutions, are designed to protect you from malware, phishing, and other threats, making them a reliable choice for enhancing digital safety on various devices.
Why is McAfee so hard to uninstall?
McAfee is so hard to uninstall because it is designed to deeply integrate with systems for robust protection. This deep integration can make uninstallation seem complex. Additionally, active background processes and residual files can hinder removal.
How long does it take to uninstall McAfee?
The time it takes to uninstall McAfee varies based on system specifics and the uninstallation method used. Typically, using McAfee’s dedicated uninstaller or system settings, the process takes between 5 to 10 minutes. However, manually removing residual files or addressing conflicts can extend this duration.
Conclusion
While McAfee offers robust security features, there are times when you may wish to uninstall it from your Mac.
The process, though seemingly complex due to the software’s deep integration, can be streamlined by following the step-by-step guide provided.
Whether you’re tech-savvy and prefer the Terminal or you’re seeking an automated uninstallation method, the key is to ensure thorough removal.
Pro Tip: After uninstalling any major software like McAfee, it’s a wise practice to restart your Mac. This ensures all changes are properly implemented and gives your system a fresh start post-removal.
About Mohit